Connectors: Add a connector
This step shows how to add a connector, configure an action, and use data mappings.
Create a Google Sheet
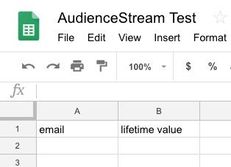
This example uses the Google Sheets connector to show how to log customer profile data to a spreadsheet, but you may use your own vendor. To prepare for this step, create a Google Sheets spreadsheet named “AudienceStream Test” and name the first two columns: “email” and “lifetime value”.
The spreadsheet looks like this:

Add the Google Sheets Connector
Use the following steps to configure the Google Sheets connector:
-
Navigate to AudienceStream > Audience Connectors.
-
Click on the + Add Connector button.
-
Under Categories in the side navigation panel, click Big Data to narrow the selections.
-
Select Google Sheets then click Continue.
-
On the Source tab, select what data you want to send
- Audience from
If audiences do not appear in the drop-down list, your account is probably not enabled for AudienceStream. Contact your account manager for assistance.
- Audience from
-
Select a trigger of In Audience at end of visit
-
Frequency Cap - (On/Off, Default: Off) controls how often the action triggers
- Action Priority
- Action Cooldown Group
-
Name the action a descriptive name, such as
VIP Big Spenders, and click Continue. -
On the Configuration tab, click Add Connector, enter the name of the connection and then click Establish Connection.
The authorization dialog for your Google account appears. -
Confirm your user account name and click Allow.
The configuration window for the connector now displays Connected. Click Done, and then Continue. -
On the Action tab, select the default action Add or Update Row, and configure the following parameters:
-
Row Operation
Select Add Only to add new a row without lookup, Update Only to lookup an existing row and update it, or Add or Update to look up an existing row update it if found or add a new row if not found. -
Spreadsheet Name
Identifies the name of the spreadsheet file to use.
Select the spreadsheet name from the drop-down, or enter the name of the spreadsheet file to use (such as “AudienceStream Test”).
-
Worksheet Name
Identifies the name of the worksheet within the spreadsheet to use.
Select the worksheet name from the drop-down, or enter the name of the worksheet to use (such as “Sheet1”).
-
Row ID
Identifies the column that contains the unique row ID for each event, in this case theEmail Addressvisitor attribute corresponds to theemailcolumn name in the sheet.
Select your attribute from the Map list and enter the corresponding spreadsheet column name (Custom Value) in the To field. When the action fires, it searches for the attribute value in the specified column, then:- If the value exists, the matching row is updated as specified by the Row Data mappings (see next).
- If the value does not exist, a new row is created with Row ID value and Attributes specified in Row Data.
-
Row Data
Map additional attributes that you want to add to the spreadsheet. Each attribute must have an assigned column name in the spreadsheet. In this case, we are logging the value of theLifetime Order Valueattribute into the spreadsheet column namedlifetime value.The names entered here must match the columns names above exactly.
-
Exclude empty values when updating
Check this box if you want to exclude empty attributes from updating or overriding existing data in your spreadsheet.
-
-
Click Continue to go to the Summary tab, and then click Finish to save.
Now save and publish your account and go the next step to start testing using the Trace tool.
This page was last updated: March 11, 2024