Add a model
This article describes how to add a model, select a target attribute, an output attribute, and exclude attributes from a model.
To learn more about the differences between target, output, and exclusion attributes, see Decide what to predict.
Use the following steps to add a model and select your target attribute:
-
In the left sidebar, click Predict.
-
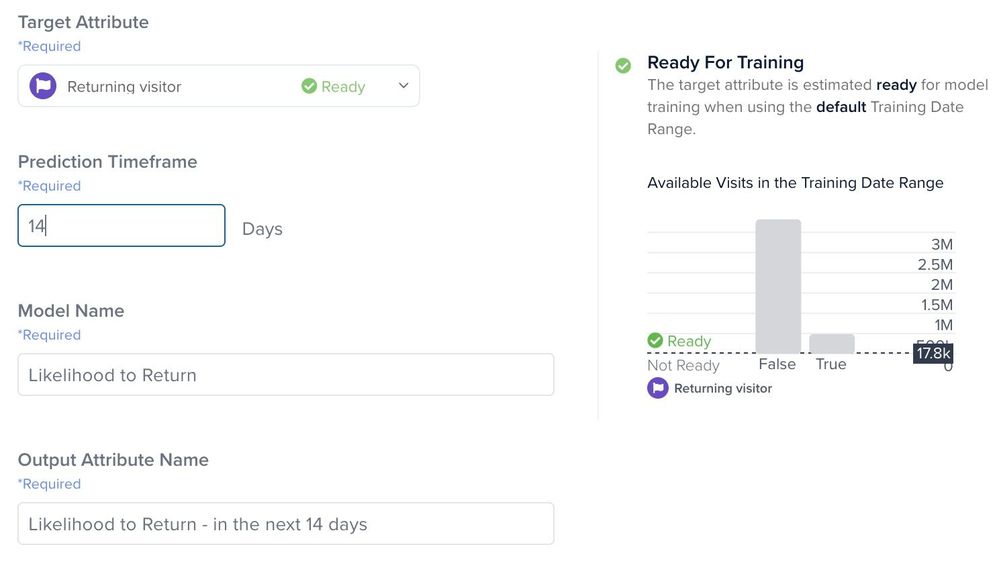
In the Add Model screen, select a target attribute from the visit- or visitor-level booleans attributes that display in the Target Attribute drop-down list. To help you decide which attribute is ready for training, you can use the health status indicators that is displayed next to each attribute.
A model can only be created if the Target Attribute selected is ‘Ready for Training’. See Prepare your data for guidance on how to get attributes ready to train.
-
In the Prediction Timeframe field, enter a number for the number of days you want to predict.
This field reflects the timeframe for the activity (target attribute), such as “likelihood to return” in the next “x” days.
-
In the Model Name field, enter a descriptive name for this model.
Use a meaningful name, for example: Likelihood to Purchase in Next 1 Days. -
In the Output Attribute Name field, accept the default name based on your model name or enter your own descriptive name for this output attribute.
-
In the optional Notes field, enter descriptive notes to help users understand what this model is intended to predict.
-
Click Next.
-
In the Edit Data Configuration screen under Training Date Range, select Most recent 91 days (Recommended) or Custom range (91 days maximum). The default option is Most recent 91 days (Recommended).
This date range refers to the data your model uses. For example, instead of all available data, you could select a specific holiday shopping timeframe.
-
If you select Custom range, use the calendar drop-down menus to select a date range.
The prediction timeframe you select determines the training data’s date range. The default value for the second date range is today’s date.- To train models for date ranges that align with your business needs, select a custom range that is 91 days or less from the most current 13 months (395 days) or total data collection, whichever is larger.
- The date range you select must be in the past and cannot be greater than today’s date.
-
You can manually exclude one or more attributes to improve the accuracy of a model by selecting the attribute(s) to exclude in the Exclude Attributes drop-down list.
- To bulk select attributes to exclude, select the Open All Attributes button within the drop-down list
- This model’s target attribute is automatically excluded, and you should not select this to be excluded again
-
Click Finish. Your new model is now displayed as
Version 1with a status ofRequires Publish. Model versions are automatically numbered consecutively, in the order they are created.
The first time you add a model, you are prompted to accept the terms of use to proceed. Read the agreement and, if you accept, click I accept the terms of use.
For more information about excluding attributes, see Decide what to predict.
This page was last updated: July 15, 2025
