Privacy Manager Extension
This article describes how to add and configure the Privacy Manager extension. The Privacy Manager extension is used to display privacy options to your customers.
We recommend using the consent manager features in place of this legacy extension.
Prerequisites
- utag v4.38 or later. For more information about updating the
utag.jstemplate, see our knowledge base article Best Practices for Updating to the Latest Version of utag.js.
How it works
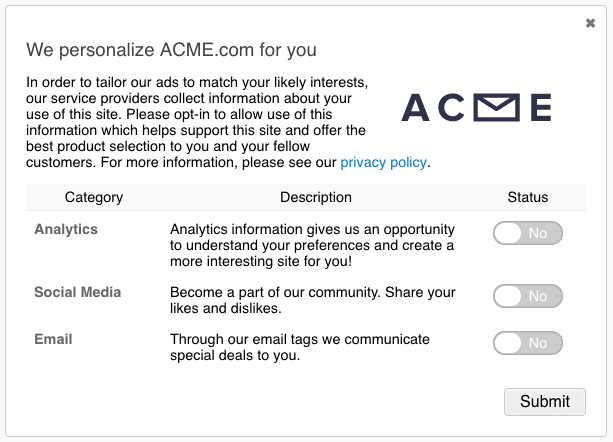
The Privacy Manager extension lets you control how privacy options are presented to your users and simplifies steps to add this functionality to your website. The privacy dialog displays the on/off status of each tag category and saves the user’s preferences in a cookie which then controls which tags are able to load on the page.

Using the extension
Before you begin, familiarize yourself with how extensions work.
Once the extension is added, the following configuration options are available:
- Widget Type: (Default: blank)
- Widget Identifier: (Default: blank)
- Widget Position: (Default: blank)
- Opt Method: (Default: Opted in by default)
- Visitor Selection Type: (Default: Choose by tag)
- Single Cookie Restriction: (Default: Retain Tealium Cookie)
All tags are eligible for opt out by default. To prohibit opt out for individual tags, click the Edit Workflow button on the left and go to the Tags to Omit tab.
Privacy Manager button
To place the Privacy Manager button on your page, you must first select an element to provide a reference point.
-
Click on the Edit Workflow button on the left to display the Edit Privacy Manager dialog.
-
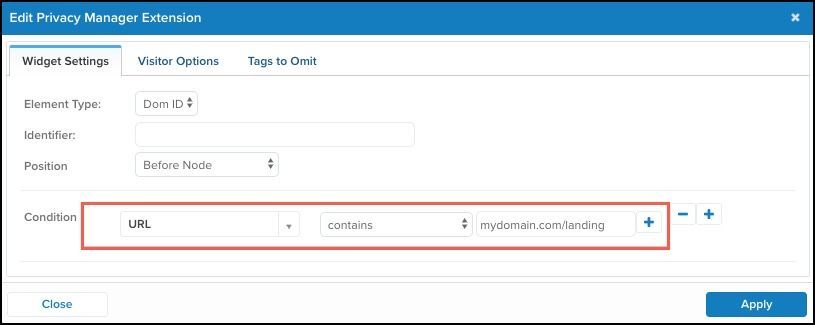
Click the Widget Settings tab to select where to position the new Privacy Manager button to display on the visitor’s screen.
- Element Type: Select DOM ID or XPath, depending on how you identify the element.
- Identifier: The ID for the referenced element
- Position: Position of the reference element
- Before Node: Places the button before the referenced element.
- After Node: Places the button after the referenced element.
- Beginning of Node: Places the button within the referenced element, at the beginning.
- End of Node: Places the button within the referenced element, at the end.
- Replace Node Content: Replaces the content of the referenced element with the button.
- Replace Node: Replaces the entire referenced element with the button.
-
Click the Add Condition button to add conditions for the Privacy Manager as shown here:

-
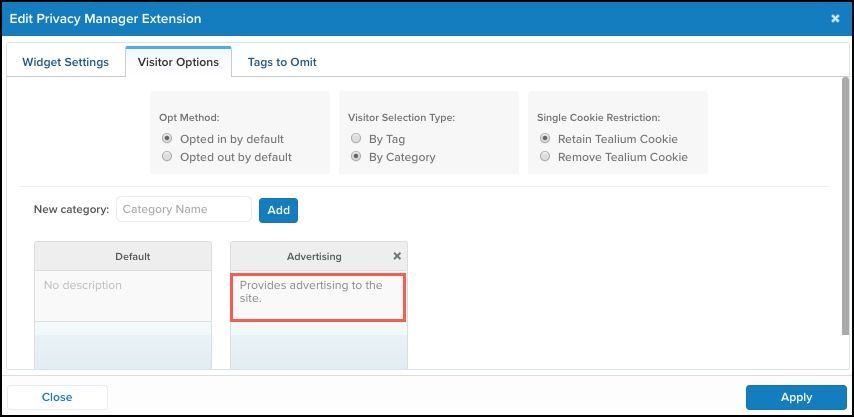
Click the Visitor Options tab to select the options that determine how the visitor chooses to opt in or out of tag tracking.

-
Opt Method: Select one of the following to determine whether the visitor is opted in or out of tag tracking by default.
- Opted in by default
- Opted out by default
-
Visitor Selection Type: Select one of the following to determine if the visitor is opted out based on tag or category of tags.
- By Tag
- By Category
See the Select Visitor Type by Category section for more information on opting in/out based on category.
-
Single Cookie Restriction: Select one of the following to determine whether to keep or remove the Tealium cookie.
- Retain Tealium Cookie
- Remove Tealium Cookie
By default, Tealium cookies are used for visitor, session, and timestamp information. Tealium cookies are also used with the Persist extension to store persistent cookie information.
-
-
Click the Tags to Omit tab and select the tags that you want exempted from the option to opt out.
The tags you select for exemption are highlighted in green. These tags are loaded regardless of whether the visitor opts in or out.
-
Click Apply and then Save/Publish your changes.
Select visitor type by category
This section describes where to define the categories to use for privacy controls.
- Click on the Edit Workflow button on the left to display the Edit Privacy Manager dialog.
- Click the Visitor Options tab and then, under the Visitor Selection Type section, select the radio button By Category.
- The New Category field appears. Under New Category, enter the name of the new category and click Add.
- The new category appears. Add a description for the new category in the space provided. This is the description that displays to the visitor in the widget.

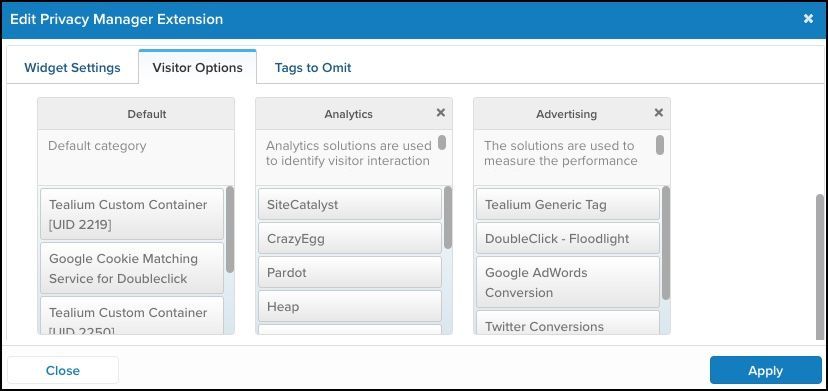
- Click on any tag in your configuration and drag and drop the tags to place them into the appropriate categories.

- Click Apply and then Save and Publish your changes.
FAQ
Is the widget style changeable?
Yes. The widget for the Privacy Manager has a default style that may or may not match your the style for your site. Adjust djust the style of the widget’s with your CSS by referencing the following class for the widget:
tealiumMo2TriggerButton
Are non-ASCII characters allowed in category names?
Yes. This section is only relevant to non-ASCII or accented characters that fail to encode properly. This is not applicable if the Category Name property has encoded correctly.
As of November 10, 2015, a bug has been resolved that caused category names with non-ASCII/accented characters to encode incorrectly. To extend the bug fix to an existing Privacy Manager extension, you must regenerate the Multi-Opt-Out template in your profile.
Regenerating the template does not preserve customizations that may have been applied. Ensure that you backup any custom code before proceeding.
Use the following steps to regenerate the Multi-Opt-Out template in your profile:
- In the admin menu, click Manage Templates.
- Open the Multi-Opt Out (Profile) UID: multioptout template.
- Delete this template by clicking the trash icon in the upper-right corner of the window.
- To confirm, click Yes.
- Save and Publish your profile.
This action refreshes the multi-opt-out template. - Repeat steps 1 and 2 to open the new template.
- Reapply any customizations that were made earlier.
- Save and publish the template changes.
This page was last updated: September 4, 2025