Advanced JavaScript Code Extension
Use the Advanced JavaScript Code extension to write JavaScript ES5 code in an enhanced editor with syntax checking, perform code diffs, GitHub integration, and a draft mode for a safeguarded publish workflow.
Prerequisites
- utag v4.38 or later. For more information about updating the
utag.jstemplate, see our knowledge base article Best Practices for Updating to the Latest Version of utag.js. - To publish this extension, you need the JavaScript Draft Promotion profile-level permission.
This is the advanced version of the JavaScript Code extension. For basic needs, see the JavaScript Code Extension.
JavaScript code extension comparison
The following table highlights the key differences between the JavaScript Code extension and the Advanced JavaScript Code extension to help you choose the one that best suits your needs.
| Feature | JavaScript Code extension | Advanced JavaScript Code extension |
|---|---|---|
| Editor | Basic text editor | Advanced code editor with syntax checking and code diffs |
| Publish workflow | Publish locations | Promote drafts to be approved for publishing |
| Remote code integration | Tealium API v3 | Link to GitHub repository |
| Permission | Account-level | Profile-level |
How it works
The JavaScript Code extension has its own publish workflow that uses drafts and a publish queue. Drafts are in-progress versions of the code that are preserved when you save the profile, but are not included in the published files by default. The publish queue lets you mark a draft to be published, which causes it to become read-only and includes it in the next publish to the corresponding environment.
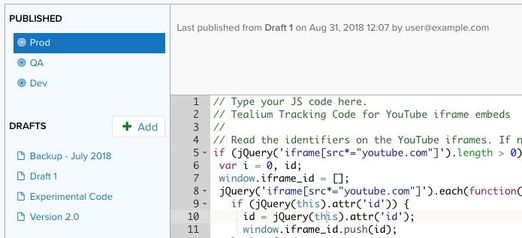
The Advanced JavaScript Code extension publish workflow ensures that your code doesn’t get published until it is ready. It also lets you see what code has been published to each environment and compare code between drafts and environments.
For information about using the JavaScript Code extension with GitHub, see About Linking to GitHub.
Drafts
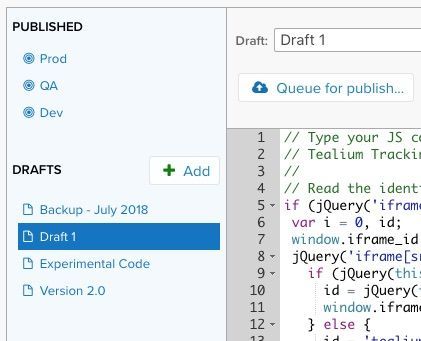
Use drafts to maintain different versions of the code without affecting your published profile. Drafts are only published when you specify an environment using the Approve for Publish workflow.
Drafts are named versions of the JavaScript code. Each instance of the extension holds up to 20 drafts. Drafts are saved each time the profile is saved, but are only published when they are explicitly added to the publish queue for specific environments. This lets you edit code and save your progress (even if it is incomplete), without affecting your publish environments.

Publish workflow
The advanced JavaScript Code extension has its own publish workflow to provide safer and more granular control over what code gets published. Drafts are not published by default.
You must have the JavaScript Draft Promotion permission to add a draft to the publish queue.

Use the following workflow:
- Add a new draft and write your custom JavaScript code. Save the profile and the code in the draft is saved but not published. Continue working on your code in this way until it’s ready to be published.
- When you are ready to publish, approve the draft to be published for one or more publish environments. The draft enters read-only mode (indicated by the lock icon) until the next publish to the selected environments, at which point it becomes editable again, except in libraries. The color of the lock next to the draft matches the icon next to the corresponding environment.

- Once a draft has been published, the live code is only reviewable (read-only mode) in the corresponding publish environments. You cannot edit the code in a publish environment directly. To make changes, edit a draft and repeat the publish workflow process.

Code editor features
The advanced JavaScript Code extension employs the Ace Editor built into the interface that offers the following convenience features:
- Syntax Checking
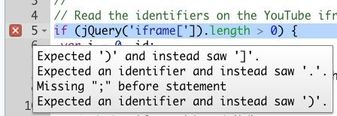
See syntax errors and warnings as you type. The margin displays helpful icons to indicate that your attention is needed on the affected line.
- Syntax Highlighting
Syntax highlighting for JavaScript. - Auto Indent and Outdent
Automatic indenting as you type. Supports thetabkey andshift+tabkey bindings. - Code Folding
Collapse blocks of code to eliminate distractions and focus on your changes.

- Full Screen Mode
Expand the Code Editor window to full screen mode to work on larger code projects.
Code execution
After a draft is published, the code is added to one of the utag files (depending on the scope). The code runs just as it appears in the code editor, but is wrapped in the following anonymous function to isolate the code and prevent conflicts with global variables:
function(a, b)
{
    // content of JavaScript Code extension runs here
}
The two parameters passed to the function are:
a- the event type (“view” or “link” or a custom value)b- a reference toutag_dataallowing you to set UDO values asb.VARIABLE_NAME="somevalue".
Be sure to scope all of your variable references accordingly to avoid overwriting global variables.
Using the extension
Before you begin, familiarize yourself with how extensions work.
Once the extension is added, create a draft as described below.
Working with drafts
Add JavaScript code to the extension using drafts.
To create a draft:
- In the sidebar, under Drafts, click + Add.
- In the text window, type or paste your JavaScript code.
- Save the profile to preserve your changes.
The following functions are available when working with a draft:

- Draft Name: Set the name of the draft. The name appears in the sidebar, sorted alphabetically in the list of drafts.
- Reset: Undo all code edits made to a draft since the last time the profile was saved.
- Delete: Delete the draft. To undo, refresh the profile without saving.
- Compare Diff: Compare the draft with another draft or with a publish environment.
- Queue for publish: Mark the draft to be published in one or more publish environments.
Publish a draft
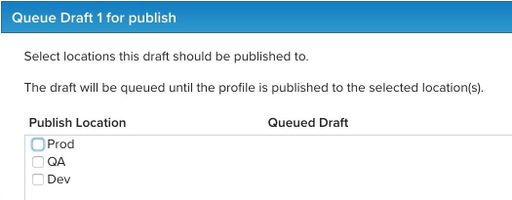
Publishing a draft is a two-step process. First, in the extension the draft must be added to the publish queue for the targeted publish environment. Second, the profile must be published to the target environment.
Remember, by default, drafts are not included in a publish unless they have been explicitly queued for publish.
To publish a draft:
- Select the draft to publish in the sidebar.
- Click Queue for publish….
- Select the checkboxes next to the publish locations you want.
- Click Continue.
The draft is now in read-only mode (indicated by the padlock icon) and the queued publish environment is indicated in the sidebar and in the draft details.

- Perform a save and publish on the profile, selecting the publish target matching the publish queue.
The published draft now appears as the active code in the corresponding publish environment in the sidebar.

Compare code
Compare a draft or a publish environment to any other draft or publish environment. The comparison window displays the versions of the code side by side with highlights for each line that differs. For example, compare Prod vs QA, Draft 1 vs Draft 2, or Draft 1 vs Prod.

Working with GitHub
The following sections describe how to reference files in a GitHub repository. Use this feature instead of writing code directly in the extension.
To work with GitHub files you must link your GitHub account to your iQ Tag Management account. For more information, see Linking to GitHub.
Add a GitHub file
To reference a file from a GitHub repository:
- In the left panel of the JavaScript Code extension, next to GitHub Files, click + Add.
You are prompted to enter the URL for the file you want to add. - Enter the URL, for example:
https://github.com/your_account/your_repository/blob/master/Tealium.js - Click Add File, and the code is now referenced in the extension.
To access files in a private repository, you must link your GitHub account with a personal access token that has the repo scope selected.
Copy the file to draft mode
Files added through GitHub are read-only and cannot be edited. To edit these files, edit them directly in GitHub or copy the file to Draft mode and edit the draft copy.
Use the following steps to copy the file to draft mode, edit, and save prior to publishing:
-
Select the file you want to copy to Draft mode.
-
Click Copy to Draft to copy the content of the file into a new draft template.
-
Enter a name and press Enter. Enter a new name or keep the same name.
If you choose to keep the same name, names remain the same as the file name. For example, if the GitHub filename is
Tealium.js, the first copy becomesTealium.js(if a draft with that name does not already exist). Subsequent copies are namedTealium.js-1,Tealium.js-2,and so on. -
Open and edit the copy.
-
Click Save.
Synchronize the file
When there is a newer version of a referenced file, you must synchronize the file. Synchronize a referenced file by expanding the view of the JavaScript Code extension.
All GitHub files attempt to sync when you open the extension unless the file is approved for publish.
Use the following steps to manually synchronize a file, including those approved for publish:
- Select the file to synchronize.
- Click Sync File to retrieve the latest copy of the file from the repository.
The updated file appears with the time and date and a green check mark to indicate that the file is up-to-date.
When working with GitHub files, the filename you are working with always appears at the top of the interface. To view the full file path, hover over the filename.
Queue the file for publish
Files queued for publish cannot be synchronized and display a lock icon next to the filename. If you attempt to synchronize a file that is queued to publish, an warning icon displays to indicate that the you are unable to connect to synchronize to new version.
Use the following steps to queue your file for publish, as you do when using the JavaScript Draft Extension
- Select the file to queue for publish.
- Click Approve for Publish, then the file status displays a new line with the timestamp and username showing the environments the file published to.
Best practices
Use the following tips to make the best use of this extension and avoid common mistakes:
- Omit
<script>tags
Do not surround the code with<script>tags. The contents of the editor is included in the published files exactly as you enter it, so adding extra HTML tags will result in broken syntax in your published files. - Reference the UDO
If you are referencing a variable from theutag_dataobject, such aspage_name, use thebobject like this:b['page_name']. For more information, see the b object. - Reference tag template variables
If you are referencing a variable defined in the tag template of the scoped tag, such asaccount_id, useu['account_id']. - Create useful draft names
Your tag management profile is a shared working environment, so use meaningful names for drafts to make them identifiable to you and others. - Comment your code
Write useful comments to make it easier for your future self and other users to understand your code and how to maintain it.
Troubleshooting
Why can’t I edit the code in the editor?
The following reasons may explain why you are unable to edit the code in the editor:
- A draft becomes read-only if it has been queued for publish and the publish has yet to occur. Remove the draft from the publish queue or publish the profile to make the draft editable again.
- The code displayed in publish environments cannot be edited directly because it is a read-only view of the published code.
Why can’t I select a publish environment in the Queue for Publish dialog?
While you might have permission to add the JavaScript Code extension and create drafts, there is a separate permission needed to promote a draft to a publish environment. If you do not have this permission, the environments in the Queue for Publish dialog are not selectable.
Check with your account administrator to see if you have the JavaScript Draft Promotion permission.
Why can’t I set the scope to Pre Loader?
If you have a condition defined, the Pre Loader option is no longer available. In Pre Loader scope, the data layer is not yet populated so there is no data object with which to evaluate the conditional logic. Likewise, the Add Condition option is disabled when the scope is set to Pre Loader.
What’s the difference between an extension run in the Pre Loader scope and one run in Before Load Rules scope with occurrence set to Run Once?
In both cases, the extension to runs once before load rules are evaluated. The differences between the scopes are:
- The Pre Loader scope does not support conditions.
- Extensions in the Pre Loader scope execute before the data layer is processed and cannot access the data layer
bobject (it doesn’t exist yet). - The code in an extension scoped to Pre Loader is not wrapped in the anonymizing function and is executed exactly as it appears in the editor. For more information, see Code Execution.
This page was last updated: September 5, 2025