Manage data mappings
This article explains how to manage data mappings.
Add a variable mapping
Vendor tag parameters (also called destinations) are built into the Data Mappings configuration screen for the tag. This is where you add and manage data mappings.
Follow these steps create a variable mapping:
- Expand a tag to view the details for that tag.
- Click the Mapped Variables tab.
- Select the variable to map.
- Click + Add Mapping.
- Select a destination from the list, or click + Add Custom Destination and enter a new custom destination.
- Click Done. The new data mapping is displayed.
- Repeat steps 2 through 6 to map additional variables.
When done, click Apply.
Add an event mapping
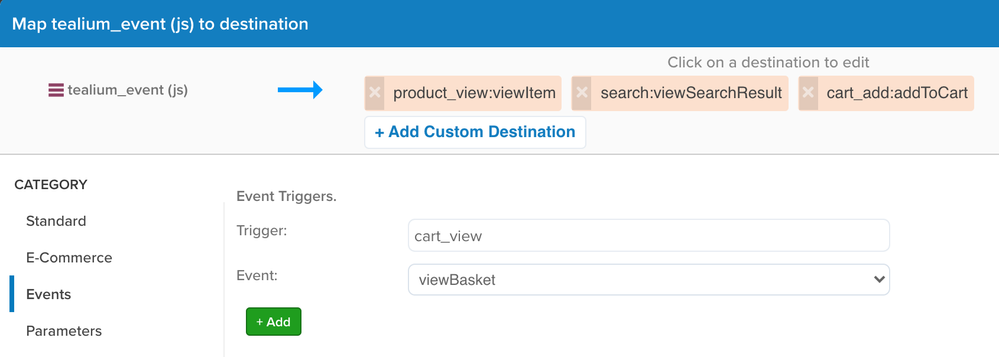
Use an event mapping to associate your event names with the vendor’s event names and corresponding tracking. First, select your event variable (typically tealium_event), then enter the event name from your data layer, then select the corresponding vendor event to trigger.

Use the following steps to map an event:
- Expand a tag to view the details for that tag.
- Click the Mapped Variables tab.
- Select the event variable to map.
- Click + Add Mapping.
- Under Category, find the Events section.
- In the Trigger field, enter the event name from your data layer.
- In the Event drop-down, select the vendor’s event to trigger.
- Click + Add. Repeat these steps to map multiple events.
- Click Apply.
Event mappings appear in the data mappings list in the format of EVENT_NAME:VENDOR_EVENT. For example, if you mapped the cart_add event to the vendor’s event addToCart, the mapping appears as cart_add:addToCart.

Add an event parameter mapping
Use an event mapping to associate your event parameter names with settings parameter names.

Use the following steps to map an event parameter:
- Expand a tag to view the details for that tag.
- Under Mapped Variables, click Edit.
- Select the event variable to map.
- Click + Select Destination.
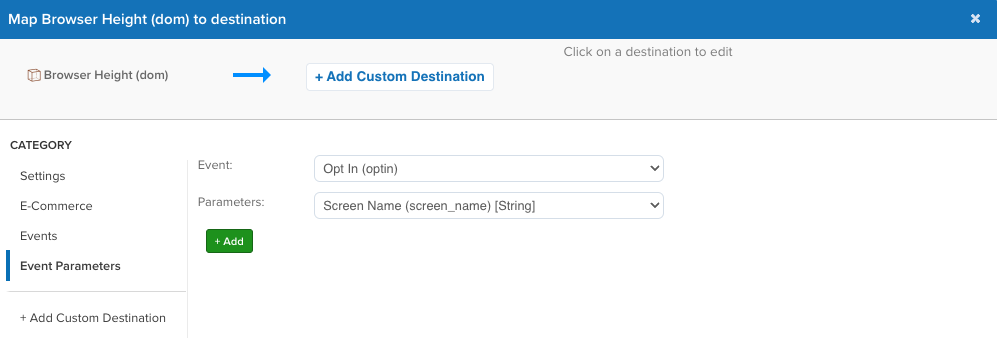
- Under Category, find the Event Parameters section.
- In the Event drop-down, select the vendor’s event parameter from your data layer.
- In the Parameters drop-down, select the settings parameter to map to.
- Click + Add. Repeat these steps to map multiple event parameters.
- Click Apply.
Event parameters mappings appear in the data mappings list in the format of EVENT_NAME:SETTINGS_PARAMETER. For example, if you mapped the sendscreenview event parameter to the settings parameter dynamic_var, the mapping appears as sendscreenview:dynamic_var.

Add a custom value mapping
Use the following steps to create a data mapping that uses a custom (static) value instead of a data layer variable:
- Expand a tag to view the details for that tag.
- Click the Mapped Variables tab.
- Expand the Variables drop-down list or click Use Custom Value.
- Click Select Destination.
The mapping dialog displays the supported vendor parameters. - Select the type of value to set and enter a value.
- Text: a simple text value.
- JS Code: a native JavaScript value, such as a number, boolean, array, object, or an inline function.
- Click Close.
The mapped variable is displayed. Repeat these steps to map additional custom values.
When done, click Apply.
Add a custom data mapping
While the built-in destinations cover most of your mapping needs, you can optionally define a custom data mapping to send data to a vendor parameter that you name.
Use the following steps to create a custom data mapping:
- Expand a tag to view the details for that tag.
- Click the Mapped Variables tab.
- Select a data layer variable from the Variables drop-down or click + Add Variable to use a new one.
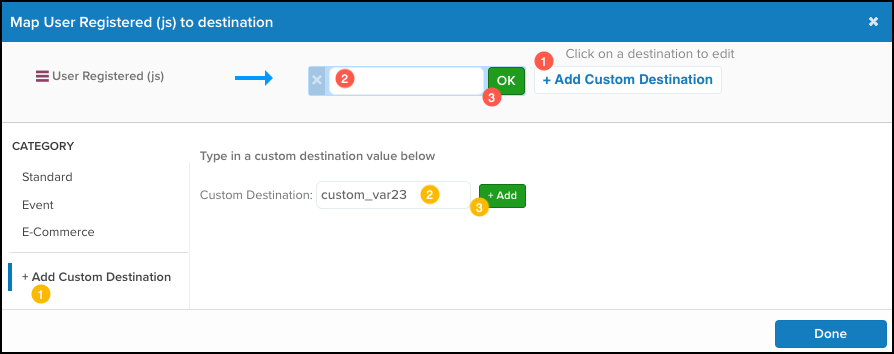
- Click + Add Custom Destination in the top panel or in the lower left panel.
- Enter a name for the custom variable.
- Click OK in the top panel or + Add if you used the bottom panel option.

Repeat the steps to add more custom mappings. When complete, click Done. The custom mapping is displayed in the Data Mappings tab.
Mapping an AudienceStream attribute
AudienceStream attributes are enriched attributes about your visitors that are sent back to your website for use with personalization.
Your profile must be populated by attributes from the matching AudienceStream profile. Those attributes are made available as data mappings in the variables drop-down menu. They are organized by attribute types and are labeled as AudienceStream variables.
For more information, see About Data Layer Enrichment.
View data mapping change history
To view the change history of a data mapping, go to iQ Tag Management > Tags and click View Tag History.
Edit a mapping
Use the following steps to edit a destination for a mapped variable:
- Expand a tag to view the details for that tag.
- Click the Mapped Variables tab.
- In a data layer variable row, click the pencil icon.
- Edit any of the following:
- Change the destination name
- Map to another destination
- Remove the destination
- Click Done.
- Repeat to edit more mappings.
- When complete, click Apply.
Edit a custom data mapping
Use the following steps to edit the destination variable:
- Expand a tag to view the details for that tag.
- Click the Mapped Variables tab.
- In a data layer variable row, click the edit icon.
- Click +Add Custom Destination.
- Enter the new name.
- Click OK to apply the changes.
- When complete, click Done.
Delete a mapping
Use the following steps to delete a mapping:
- Expand a tag to view the details for that tag.
- Click the Mapped Variables tab.
- Click the trash icon next to the mapping you want to remove.
- Click Apply to confirm.
No warning or confirmation message appears. The deleted mapping cannot be restored.
This page was last updated: April 19, 2024