Adobe Test & Target Tag Setup Guide
Adobe Test & Target gives marketers the necessary capabilities to continually make their online content and offers more relevant to their customers – yielding greater conversion.
Tag Specifications
Name: Test & Target
Vendor: Adobe
Type: Personalization
Requirements
Services: Adobe Marketing Cloud Account
Configurations:
- Client Code
- Timeout
- Global mbox Name (synchronous version)
Tag Configuration in Tealium iQ Tag Management
Step 1. Add the Tag
Go to the tag marketplace to add a new tag. For more information about how to add a tag, see Manage tags.
Tealium supports both asynchronous and synchronous versions of the Test & Target Tag. Each version is a separate tag in the tag marketplace. However, we recommend that you use the asynchronous version. If you have concerns about flicker, check out our Flicker-Free Test & Target solution, which allows you load the Test & Target Tag asynchronously and avoid the appearance of flicker.
You must add and configure the Test & Target Content Modification extension along with the asynchronous tag. The synchronous version does not use the extension.
Step 2. Configure the Tag
Asynchronous
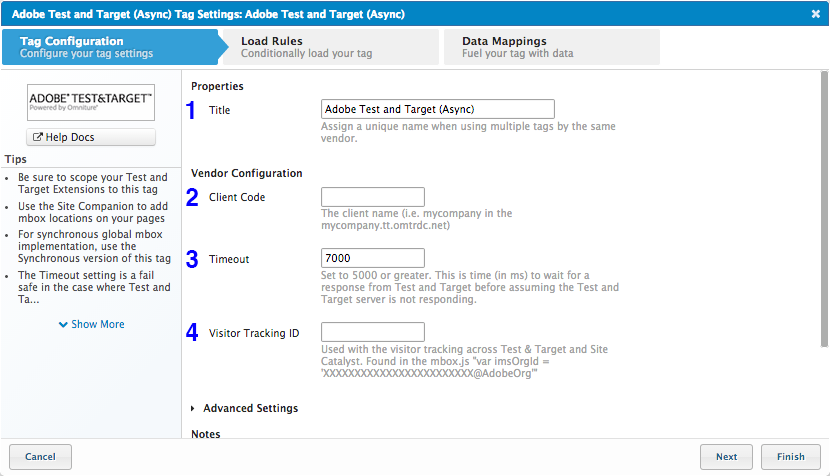
As a best practice we recommend using the asynchronous version of Test & Target. There are a few differences in the configurations, depending on which version you use. For the asynchronous version, set the following configurations:

- Title: (Required) Enter a descriptive title to identify the tag instance.
- Client Code: (Required) Enter the client ID assigned to you by Adobe.
- Timeout: (Required) Enter the amount of time, in milliseconds, you want the tag to wait for a response from Adobe before assuming the Test & Target server is not responding. If there is no response from the server, the tag call is halted. We recommend setting this to 5000 milliseconds or greater.
- Visitor Tracking ID: (Optional) This field lets you track visitors across Test and Target and SiteCatalyst. You can find this configuration in the
mbox.jsfile asvar imsOrgId = 'XXXXXXXXXXXXXXXXXXXXXXXX@AdobeOrg'
You’ve finished configuring the Test & Target Tag.
Synchronous
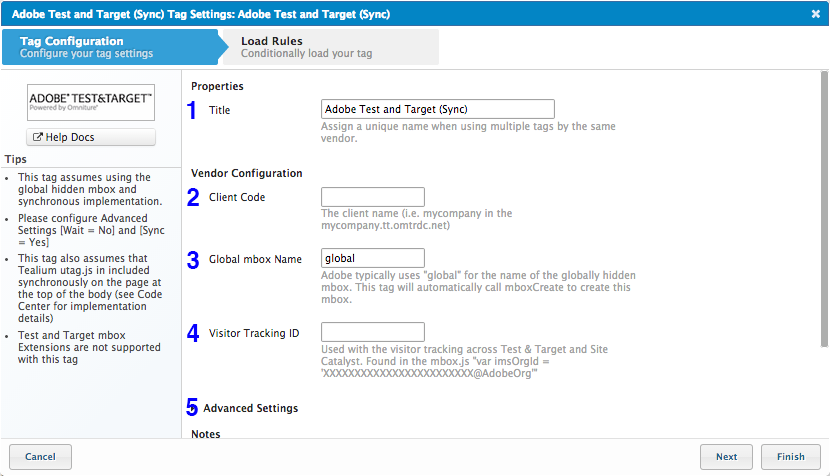
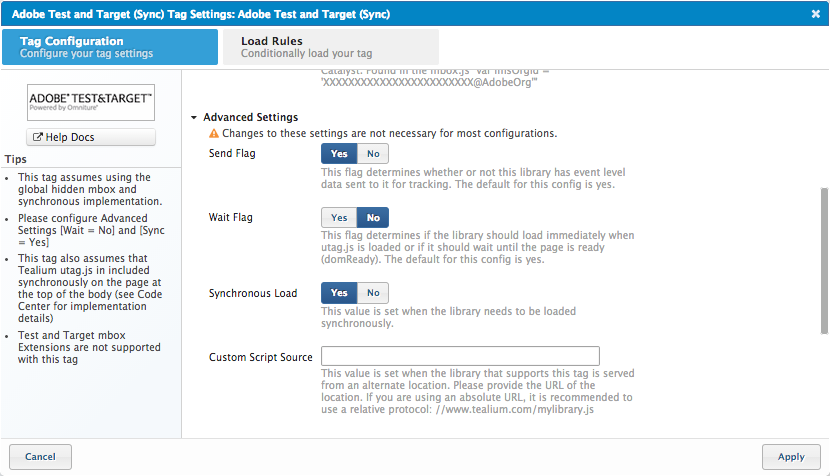
The synchronous version of Test & Target has a slight difference in configurations and requires a change to the Advanced Settings of the tag. If you plan to load this tag synchronously, then you must load the utag.js file synchronously as well. For information about how to acquire the synchronous utag.js code, see How utag.sync.js works.

- Title: (Required) Enter a descriptive title to identify the tag instance.
- Client Code: (Required) Enter the client ID assigned to you by Adobe.
- Global mbox Name: (Required) Enter the name of the globally hidden mbox. Adobe typically uses
globalhere. The tag automatically callsmboxCreateto create the mbox. - Visitor Tracking ID: (Optional) This field lets you track visitors across Test and Target and SiteCatalyst. You can find this configuration in the
mbox.jsfile asvar imsOrgId = 'XXXXXXXXXXXXXXXXXXXXXXXX@AdobeOrg' - Advanced Settings: (Required) Change the following Advanced Settings:
Any further configuration of the test content is handled through Test & Target’s user interface.
Step 3. Apply Load Rules
Load Rules determine when and where to load an instance of this tag. The Load on All Pages rule is the default Load Rule. To load this tag on a specific page, create a new load rule with the relevant conditions.
Best Practice: We recommend that you load this tag on all pages by leaving the default Load on All Pages selected. For the asynchronous version, you can control the conditions under which your tests load through the Test & Target Extension.
Step 4. Set up Mappings
Mapping is the simple process of sending data from a data source, in your Data Layer, to the matching destination variable of the vendor tag.
- For the asynchronous version of Test & Target, mappings are handled through the Test & Target Content Modification extension in the Static Params field.
- Mapping is not supported for the synchronous version of Test & Target.
This page was last updated: November 17, 2022
