Adobe Experience Cloud ID Service Tag Setup Guide
Adobe’s Experience Cloud ID Service tag generates unique identifiers, called Cloud ID, for your site visitors. A Cloud ID makes it possible to share and track data for a visitor across your Experience Cloud Solutions. This article describes how to configure the tag in your iQ Tag Management (TiQ) profile.
It is crucial to load the Cloud ID Service tag prior to other Adobe tags (such as Appmeasurement, JavaScript, and Heartbeat) that require Cloud ID. Bundle the tag on all pages and place it above all other Adobe tags in the Tags tab. This is the best way to ensure that the Cloud ID is accessible before other Adobe tags load on the page.
Supported Versions
- v5.5 (latest and recommended)
- v5.4
- v5.3
- v5.2
- v4.4
- v4.3
- v4.1
- v3.0
Adobe Web SDK Opt-in module
Adobe Analytics introduced the Opt-in module in Web SDK version 4.0.0. The Opt-in module provides mechanisms to verify and enforce user consent, which is crucial for adhering to privacy laws such as GDPR and CCPA. Enhanced checks in version 5.2.0 ensure that Adobe tools have the required permissions to run.
If you are using version 4.0 or newer of the Experience Cloud ID Service tag, the Opt-in module must be enabled after you have configured the tag, otherwise event data will not be sent to Tealium. For more information, see Enable the Adobe Web SDK Opt-in module.
Tag Configuration
First, go to the tag marketplace and add the Experience Cloud ID Service tag to your profile (See Add a tag).
After adding the tag, configure the following settings:
- Adobe Org ID
- (Required) Enter the alphanumeric Experience Cloud ID assigned to your organization.
- Case sensitive.
- For example,
265H7Z562851TTX99W870V12@AdobeOrg
- Tracking Server
- (Required) Enter the domain used for your Adobe Analytics data collection.
- This is where the image request and cookies are processed.
- For example,
site.mydomain.com
- Tracking Server Secure
- (Optional) If you are using a secure tracking server, enter the URL in this field.
- Experience Cloud Server
- (Optional) If you are using first-party data collection (CNAME) to utilize first-party cookies in a third-party context, enter the tracking server URL in this field.
- Experience Cloud Server Secure
- (Optional) If you are using a secure Experience Cloud Server, enter the URL in this field.
- Code Version
- (Required) Version 3.0 and later no longer support Internet Explorer versions 6 through 9.
Use Data Mappings (see below) if you prefer to configure the tag settings dynamically.
Load Rules
Load Rules determine when and where to load an instance of this tag on your site.
Recommended Load Rule: Load on all pages.
Data Mappings
Mapping is the process of sending data from a Data Layer Variable to the corresponding destination variable of the vendor tag. For instructions on how to map a variable to a tag destination, see Data Mappings.
The destination variables for the Cloud ID Service tag are built into its Data Mapping tab. Available categories are:
Standard
| Variable | Destination Name | Description |
|---|---|---|
adobe_org_id |
Adobe Org ID | Alphanumeric ID assigned to your company’s Experience Cloud Solution. |
config.trackingServer |
Tracking Server | Data collection server URL. |
config.trackingServerSecure |
Tracking Server Secure | Data collection secure server URL. |
config.marketingCloudServer |
Experience Cloud Server | Data Collection server URL if CNAME is enabled. |
| config.marketingCloudServerSecure | Experience Cloud Server Secure | Data Collection server URL if CNAME is enabled. |
Customer IDs
Map to these destinations for sending additional customer identifiers.
Use the following steps to map the destinations:
- Select a customer property from the Property list.
- In the Customer ID field, enter the value of the variable being mapped.
The property is sent when your supplied value is found in the data layer.
| Property Name | Type | Description |
|---|---|---|
ID |
String | Additional ID for the same visitor. |
authState |
Integer | Indicates the authentication status. Possible values are:
|
Events
To map events, refer to Create an Event Mapping
| Variable | Type | Description |
|---|---|---|
setCustomerID |
String | Set Customer ID |
Enable the Adobe Web SDK Opt-in module
If you are using version 4.0 or newer of the Experience Cloud ID Service tag, the doesOptInApply option must be set to true for event data to be sent to Tealium. To set doesOptInApply, create a JavaScript extension scoped to the Adobe Experience Cloud ID Service Tag, as follows:
- Go to iQ Tag Management > Extensions.
- Click the Advanced tab and click + Add for JavaScript Code.
- For Scope, select Tag Scoped Extensions, then select Adobe Experience Cloud ID Service.
- Under Configuration, enter the following code:
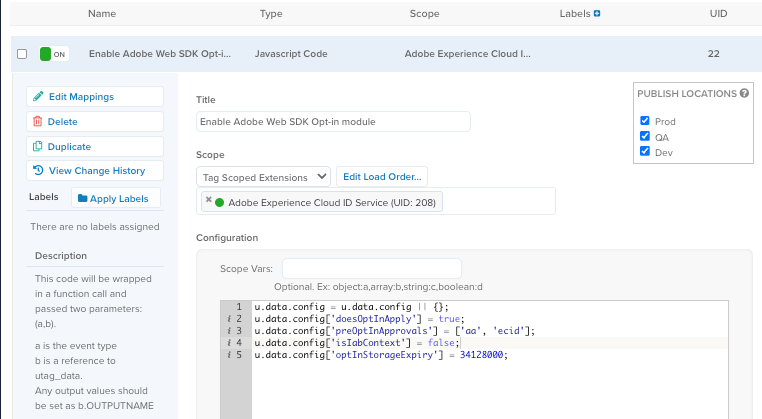
The following figure shows an example configuration of an extension that enables the Adobe Opt-in module:
u.data.config = u.data.config || {};
u.data.config['doesOptInApply'] = true;
u.data.config['preOptInApprovals'] = ['aa', 'ecid'];
u.data.config['isIabContext'] = false;
u.data.config['optInStorageExpiry'] = 34128000;

- Save and publish.
You can validate that the Opt-in service is working as expected using developer tools in your browser. For more information, see the Adobe documentation about Validating Opt-in Service.
Use Live Events to verify that Adobe Analytics and Adobe Experience Cloud event data is being sent to Tealium. For more information, see About Live Events.
Vendor Documentation
This page was last updated: March 4, 2021